YOLO原理代码赏析
写在前面
YOLO作为一个小而美,快而准的目标检测网络,在互联网上饱受赞誉,从yolov1->yolov3,也是在一直在不断进化,作为one-stage检测界的扛把子,只要做目标检测,没有理由不去了解YOLO!
YOLO代码实现有多个版本,其中论文的作者使用C和CUDA自己撸了一个DL框架并用于目标检测Darknet,但是这玩意毕竟小作坊产物,只是为了自家YOLO开发的框架,不太实用,但是用哪个框架实现并不是关键,关键的是one-stage的核心思想!
在github上搜索,YOLO版本也层出不穷,本次赏析的代码就是来自检索YOLO关键词排名第一的代码,Keras-YOLOv3.顾名思义,用keras实现的,此外是v3的版本,那么v1v2呢?有最好的肯定不管他们了噻(但从研究的角度出发,依然需要认真阅读v1v2的paper,因为v3没有正式发表paper,只是挂在arxiv上面,很多地方没说清楚)
为何qwe的代码能排第一呢?私以为:
- 代码结构简洁清晰,感觉要比其他家代码清爽
- keras作为当下最流行的DL框架,自然也是好用到飞起
作为一个完整的目标检测工程,肯定要有数据集格式转换,数据读取(预处理),网络部分,后处理部分几大模块,作为一个学术分享会,我只分析网络部分和Loss关键部分来讲,其他的就请自行研究吧.
YOLO进化历史
YOLO是one-stage目标检测网络
YOLO不需要先提出ROI感兴趣,直接预测bboxes
- v1:在分类回归bbox的时候使用了全连接层
- v2:backbone使用了BN;引入了anchor的概念并聚类获取预设anchor;回归bbox方式做了变化,摒弃了全连接预测bbox的方法
- v3:backbone引入了resnet的思想;同样使用了anchor并引入了FPN结构;loss在bbox分类时用BCE_loss
YOLO网络部分
YOLO网络部分可以分成特征提取backbone主体(darknet_body),Neck脖子(make_last_layer, upsamples),和头部(YOLO_head) (ps:脖子部分这个名词是我凭空臆造的哈)
- backbone负责提取特征,输出feature map
- 脖子部分功能:YOLO要把feature map中蕴含的信息转换为坐标,类别,这就需要把feature map的维度使用conv拉到指定的维度,结合anchor训练来输出关键性信息;同时为了提高回归位置精度,借鉴了fpn的思想,需要多个scale的feature map来提供最后的输出,因此还要用到一些upsample和concat
- 头部功能:得到了网络的输出,要和真实数据标注对接上计算loss,需要对数据的格式进行reshape,同时对原始grid_cell中的(x,y,w,h)做相应的激活,yolo_head主要干这些
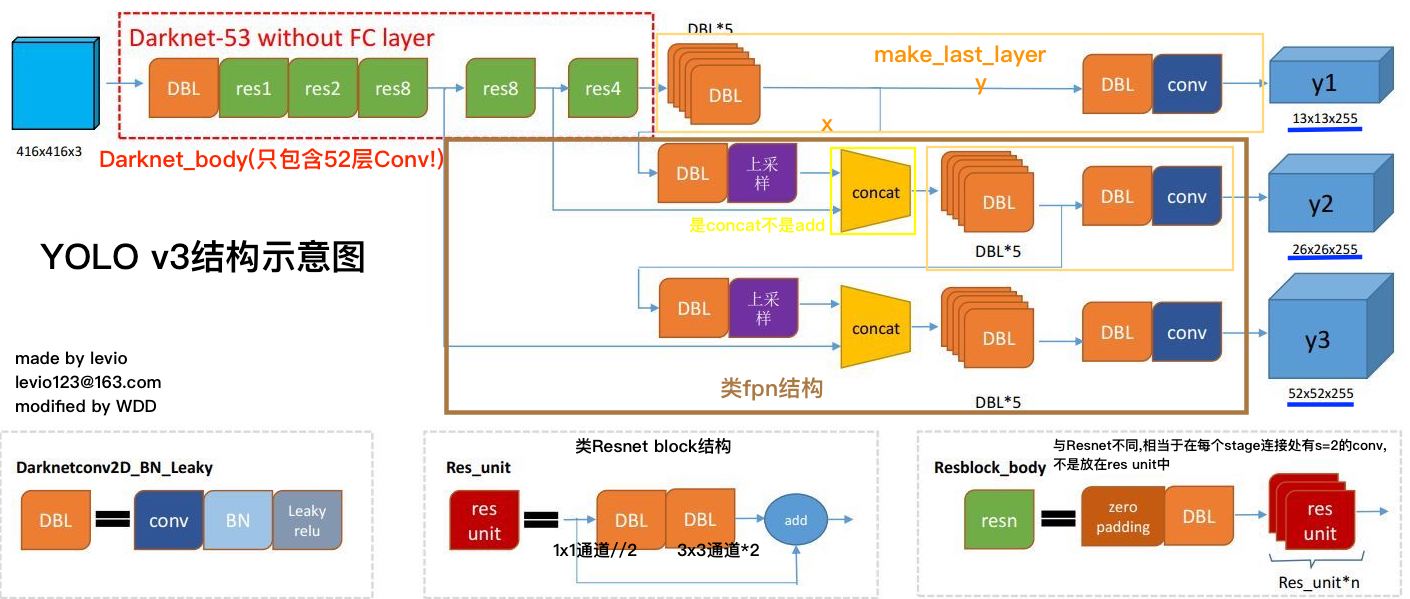
我们可以借鉴netron来分析网络层,整个yolo_v3_body包含252层,组成如下:
 整个网络就这么多内容,下面详细分解代码并讲解:
YOLO网络全貌—yolo_body
def yolo_body(inputs, num_anchors, num_classes)
先分析形参:输入数据, 多少个anchor, 分类类别
默认状态下,YOLO借鉴fpn有3个scale的feature_map输出,在每个feature_map的每个格子(grid_cell)中,使用了3个anchor,这样排列组合出来就是9种不同的anchor
对于类别,COCO有80类,因此num_classes=80
对于初学者,分析一个网络最好的方式就是先摸清tensor在网络中shape的变化规律,可以帮助理解原理.
整体分析,
- 输入图像分辨率(416,416)经过5个stage,输出feature_map的scale应该为416/32,也就是(13,13)
- YOLO预测bbox的思想是,以backbone输出的feature_map尺寸(13, 13)看做坐标参考系,也就是所谓的栅格grid.这样可以划分出13x13个格子,把这个棋盘格对应到原图上就相当于是建立了一个坐标体系.每个格子去预测三个bbox,每个bbox负责预测一个对象,同时每个bbox有一个预设的anchor基准,把确定出bbox的信息(x,y,w,h,c,…80classes…)放在每个格子的通道中
因此,网络一个scale输出raw_tensor的shape应该为:(13,13,3*85)
我们来算一哈, 一共有13x13个位置,每个位置有3个bbox,可以算出最多可以预测13x13x3个bbox(同时需要13x13x3个预设anchor),每个bbox都是相互独立的
设计好了网络大致的模型后,我们应该考虑如何让输出的Tensor就是我们需要的结果,这就是训练过程要做的事情.
要想让输出tensor更接近我们想要的结果,需要合理设计loss,以及使用一些其他的trick哦.
下面进入代码详解:
首先就是搭建整个YOLO网络的函数,传入形参为:训练数据,anchor数量,分类类别
1
2
3
4
5
6
7
8
9
10
11
12
13
14
15
16
17
18
19
20
def yolo_body(inputs, num_anchors, num_classes):#传入多有少个anchor
    """Create YOLO_V3 model CNN body in Keras."""
    ##--------------网络backbone--------------
    darknet = Model(inputs, darknet_body(inputs))#darknet_body 网络backbone
    ##--------------网络脖子Neck--------------
    x, y1 = make_last_layers(darknet.output, 512, num_anchors*(num_classes+5))#make_last_layer1

    x = compose(#构建第二个scale的
            DarknetConv2D_BN_Leaky(256, (1,1)),
            UpSampling2D(2))(x)
    x = Concatenate()([x, darknet.layers[152].output])
    x, y2 = make_last_layers(x, 256, num_anchors*(num_classes+5))#make_last_layer2

    x = compose(#构建第三个scale
            DarknetConv2D_BN_Leaky(128, (1,1)),
            UpSampling2D(2))(x)
    x = Concatenate()([x,darknet.layers[92].output])
    x, y3 = make_last_layers(x, 128, num_anchors*(num_classes+5))#make_last_layer3

    return Model(inputs, [y1,y2,y3])#y1,y2,y3构成不同scale的feature组,此处不能concat,因为scale不一样,统一放到一个list中
backbone–darknet_body
darknet_body(x)主干网络搭建的函数
下面是v3中darknet的网络结构图
下面就是darknet与resnet的找不同环节:
Darknet有52个Conv2D:
s1: 1+1x2 +1=4 channel->64
s2: 2x2 + 1=5 channel->128
s3: 2x8 +1=17 channel->256
s4: 2x8 +1=17 channel->512
s5: 2x4 +1=9 channel->1024
sumUp = 52! Bingo!
Res Unit
每个Res_Unit中借鉴了Bottleneck的思想,使用1x1 的卷积核将通道拉低,然后再用3x3的卷积核将通道拉回来,每个block均使用了残差pixel-add方式. 在每个stage连接处有专门的Con2D(3x3, s=2)来降低feature_map的尺寸,这点与Resnet搞法是不一样的.
注意:Darknet-53指的是整个分类网络有53层,包括了FC,但是YOLOv3没有使用avgpool和fc YOLO的backbone只是借鉴的残差网络的shortcut残差思想,并非照搬Resnet-50的结构!!
通道变化:64->128->256->512->1024
Resnet
Resnet是用Bottleneck Block模块重复构建 Resnet在stage连接处为了匹配维度,用到了名为Projection的方式,更加严谨,详情可以查看我的另外一篇博客经典CNN网络源码剖析
1
2
3
4
5
6
7
8
9
10
11
def darknet_body(x):#darknet主干网络
    '''Darknent body having 52 Convolution2D layers'''
    x = DarknetConv2D_BN_Leaky(32, (3,3))(x)
    x = resblock_body(x, 64, 1)

    x = resblock_body(x, 128, 2)
    x = resblock_body(x, 256, 8)
    x = resblock_body(x, 512, 8)
    x = resblock_body(x, 1024, 4)
    return x
下面看一哈resblock_body残差块是怎么实现的
def resblock_body(输入feature_map, 输出通道数, block重复次数)=>return feature_map
这个是构建基于darknet的小轮子,
每用一次resblock_body() ,意味着feature map的scale缩小一倍,在resblock_body开始有专门的conv(s=2, k=3)来降分辨率,darknent同样没有用pooling的方式降scale.
1
2
3
4
5
6
7
8
9
10
11
12
13
14
def resblock_body(x, num_filters, num_blocks):
    '''
    x:输入, num_filters:输出通道, num_blocks,重复块的次数
    '''
    # Darknet uses left and top padding instead of 'same' mode
    x = ZeroPadding2D(((1,0),(1,0)))(x)
    x = DarknetConv2D_BN_Leaky(num_filters, (3,3), strides=(2,2))(x)#此处使用了stride=2降低分辨率(不用pooling)
    #重复构建残差网络,这个算基本的block
    for i in range(num_blocks):
        y = compose(
                DarknetConv2D_BN_Leaky(num_filters//2, (1,1)),#使用1x1的conv先将通道先降//2,
                DarknetConv2D_BN_Leaky(num_filters, (3,3)))(x)#使用3x3将通道后拉升回去
        x = Add()([x, y])#add
    return x
基本Conv2D模块
就是普通的Conv2d->BN->LeakyReLU结构
1
2
3
4
5
6
7
8
def DarknetConv2D_BN_Leaky(*args, **kwargs):
    """Darknet Convolution2D followed by BatchNormalization and LeakyReLU."""
    no_bias_kwargs = {'use_bias': False}
    no_bias_kwargs.update(kwargs)
    return compose(
        DarknetConv2D(*args, **no_bias_kwargs),
        BatchNormalization(),
        LeakyReLU(alpha=0.1))
编程Tips:
args是一个整体对象(以元组的形式集合),*args则是多个对象(元组中所有的元素)
*args是将元组打开,**是指以字典方式传入元素,形成的对象是一个字典
脖子部分—make_last_layers
x, y1 = make_last_layers(darknet.output, 512, num_anchors*(num_classes+5))最后一层拉通道
输出为两部分,x和y,x是用于fpn的feature_map, y作为送入YOLO_head的输出
darknet.output网络输出
num_filters输出通道数量(512)
out_filters调整输出通道(num_anchors安可的数量)
1x1,num_filters->3x3,2*num_filters->1x1,num_filters->
x可以看成feature_map,y可以看成最后的输出,送入到后面的YOLO_HEAD
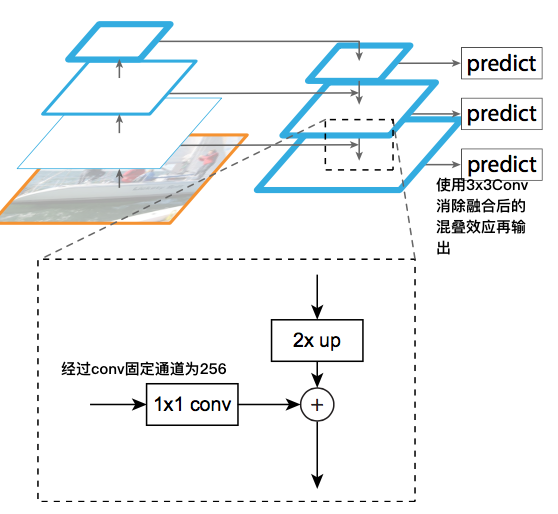
fpn的效果
1
2
3
4
5
6
7
8
9
10
11
12
13
def make_last_layers(x, num_filters, out_filters):#网络输出
    '''6 Conv2D_BN_Leaky layers followed by a Conv2D_linear layer'''
    x = compose(
            DarknetConv2D_BN_Leaky(num_filters, (1,1)),#此处为图中的DBL*5
            DarknetConv2D_BN_Leaky(num_filters*2, (3,3)),
            DarknetConv2D_BN_Leaky(num_filters, (1,1)),
            DarknetConv2D_BN_Leaky(num_filters*2, (3,3)),
            DarknetConv2D_BN_Leaky(num_filters, (1,1)))(x)
    y = compose(
            DarknetConv2D_BN_Leaky(num_filters*2, (3,3)),
            DarknetConv2D(out_filters, (1,1)))(x)#y通道数拉到了anchor的数量,
    return x, y
脖子部分—类FPN结构
FPN介绍
FPN(feature Pyramid Networks)层级金字塔,
输入图像经过多个Stage的Conv之后,feature_map的语义信息高级,网络更深了,感受野更大,能获取更高级的语义信息,分类效果会更好.
但是目标检测不仅仅是分类就完了,还需要确定bbox精准的位置信息,在一个小size的feature_map上预测原图中object的位置,肯定会有较大偏差
fpn就是为了统一这两个矛盾而生,通道先降后升再add,将不同scale的信息融合,输出多个新的feature_map.FPN结构可以嵌入到之前的主干网络,构成一个新的结构,输出不同scale的feature_map

YOLO中借鉴FPN的方式
make_last_layers()=>x,y
返回的x作为下一级FPN结合的feature_map,经过Upsample分别得到两个高分辨率scale的feature map
YOLO在upsample后面使用了concat,原FPN使用的是pixel-add
原FPN的lateral connection中使用了1x1的conv2d将通道全部固定为256,也就是金字塔右侧feature_map的通道数全都是256,然鹅YOLO的并没有这样做
如YOLO结构图所见,YOLOv3一共有三个不同的scale的输出,输出tensor的尺寸不一样,但是通道数都是255.
YOLO是基于grid_cell处理bbox,有种分而治之的思想,每个格子都有3个anchor,只负责预测中心点位于自己格子内物体
我们分析一下,如果使用(13x13) (26x26) (52x52)构建棋盘网格,肯定是格子越多回归坐标越精细,这也从宏观直觉上映证了FPN的优势
YOLO Head
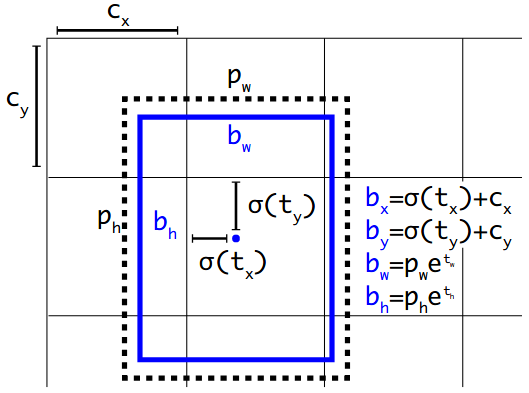
上面计算的都是相对坐标$(t_x, t_y, t_w, t_h, t_o)$
结合anchor,输出最后bbox的绝对坐标(x,y,w,h)
anchor只care形状,不care位置,就是(h,w),因此相乘就可以了
获取得到的YOLO feature,也就是后面的$(grid_h, grid_w, anchor_{num} * 85)$
feature形变解析
一维YOLO网络出来的anchor是(h,w,anchor_nums5这种形式),在axis=2存储每个anchor这个维度上是连续存储,因此使用reshape就可以将这个分开
reshape成[N, H, W, (num_anchorsnum_classes+5)]
bbox参数回归的计算公式
$b_x=\sigma(t_x)+c_x$
$b_y=\sigma(t_y)+c_y$
$b_w=p_wE^t_w$
$b_h=p_hE^t_h$

如果需要把anchor_num放置在axis=1维度,可以使用reshape之后再transpose
理解:
使用$sigmoid$激活函数$t_x,t_y$是将其值域限制在(0,1),这样每个点的中心坐标不会偏移出grid_cell,保证了每个格子的anchor只负责预测其中的物体.
1
2
3
4
5
6
7
8
9
10
11
12
13
14
15
16
17
18
19
20
21
22
23
24
25
26
def yolo_head(feats, anchors, num_classes, input_shape, calc_loss=False):
    """Convert final layer features to bounding box parameters."""
    num_anchors = len(anchors)
    # Reshape to batch, height, width, num_anchors, box_params.
    anchors_tensor = K.reshape(K.constant(anchors), [1, 1, 1, num_anchors, 2])

    grid_shape = K.shape(feats)[1:3] # height, width
    grid_y = K.tile(K.reshape(K.arange(0, stop=grid_shape[0]), [-1, 1, 1, 1]),
        [1, grid_shape[1], 1, 1])
    grid_x = K.tile(K.reshape(K.arange(0, stop=grid_shape[1]), [1, -1, 1, 1]),
        [grid_shape[0], 1, 1, 1])
    grid = K.concatenate([grid_x, grid_y])
    grid = K.cast(grid, K.dtype(feats))

    feats = K.reshape(#将feature map重新排列,经每个anchor独立分开用于计算
        feats, [-1, grid_shape[0], grid_shape[1], num_anchors, num_classes + 5])

    # Adjust preditions to each spatial grid point and anchor size.
    box_xy = (K.sigmoid(feats[..., :2]) + grid) / K.cast(grid_shape[::-1], K.dtype(feats))
    box_wh = K.exp(feats[..., 2:4]) * anchors_tensor / K.cast(input_shape[::-1], K.dtype(feats))#结合生成的anchor_tensor进行计算
    box_confidence = K.sigmoid(feats[..., 4:5])#object的置信度c
    box_class_probs = K.sigmoid(feats[..., 5:])#80个类别

    if calc_loss == True:
        return grid, feats, box_xy, box_wh
    return box_xy, box_wh, box_confidence, box_class_probs
YOLO loss分析
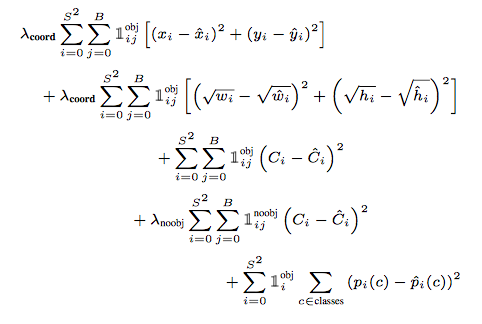
只有YOLO v1明确提出了loss公式,V2和V3都使用了anchor的概念,因此计算loss的方式做出了调整
针对YOLO这种预测bbox的方式,需要确定下面的关键信息:
(x, y), (w, h), confidence, class
下面是v1的loss function

v3对bbox进行预测的时候,对anchor中心点(xy)也使用了BCE,这么搞还是挺神奇的,至于为啥我还没研究透彻(难道是因为前面用了Sigmoid输出就不接MSE?)
对anchor的wh使用了MSE,这点倒算正常,以上这些在v3论文中没有明确说明.
有一点v3论文中是说了的,对80个类别分类时使用了BCE,这样避免了类间竞争(softmax+CE多分类判定概率最大的类作为输出,这样会形成竞争).
v3每次对b-box进行predict时,输出和v2一样都是$(t_x, t_y, t_w, t_h, t_o)$,然后通过公式1计算出绝对的(x, y, w, h, c)。
组合上面几部分损失,最后加到一起就可以组成总的loss_funciton
下面来看一下代码怎么实现的:
1
2
3
4
5
6
7
8
9
10
11
12
13
14
15
16
17
18
19
20
21
22
23
24
25
26
27
28
29
30
31
32
33
34
35
36
37
38
39
40
41
42
43
44
45
46
47
48
49
50
51
52
53
54
55
56
57
58
59
60
61
62
63
64
65
66
67
68
def yolo_loss(args, anchors, num_classes, ignore_thresh=.5, print_loss=False):
    '''Return yolo_loss tensor

    Parameters
    ----------
    yolo_outputs: list of tensor, the output of yolo_body or tiny_yolo_body
    y_true: list of array, the output of preprocess_true_boxes
    anchors: array, shape=(N, 2), wh
    num_classes: integer
    ignore_thresh: float, the iou threshold whether to ignore object confidence loss

    Returns
    -------
    loss: tensor, shape=(1,)

    '''
    num_layers = len(anchors)//3 # default setting
    yolo_outputs = args[:num_layers]
    y_true = args[num_layers:]
    anchor_mask = [[6,7,8], [3,4,5], [0,1,2]] if num_layers==3 else [[3,4,5], [1,2,3]]
    input_shape = K.cast(K.shape(yolo_outputs[0])[1:3] * 32, K.dtype(y_true[0]))
    grid_shapes = [K.cast(K.shape(yolo_outputs[l])[1:3], K.dtype(y_true[0])) for l in range(num_layers)]
    loss = 0
    m = K.shape(yolo_outputs[0])[0] # batch size, tensor
    mf = K.cast(m, K.dtype(yolo_outputs[0]))

    for l in range(num_layers):#分为3个scale
        object_mask = y_true[l][..., 4:5]
        true_class_probs = y_true[l][..., 5:]

        grid, raw_pred, pred_xy, pred_wh = yolo_head(yolo_outputs[l],
             anchors[anchor_mask[l]], num_classes, input_shape, calc_loss=True)
        pred_box = K.concatenate([pred_xy, pred_wh])

        # Darknet raw box to calculate loss.
        raw_true_xy = y_true[l][..., :2]*grid_shapes[l][::-1] - grid
        raw_true_wh = K.log(y_true[l][..., 2:4] / anchors[anchor_mask[l]] * input_shape[::-1])
        raw_true_wh = K.switch(object_mask, raw_true_wh, K.zeros_like(raw_true_wh)) # avoid log(0)=-inf
        box_loss_scale = 2 - y_true[l][...,2:3]*y_true[l][...,3:4]

        # Find ignore mask, iterate over each of batch.
        ignore_mask = tf.TensorArray(K.dtype(y_true[0]), size=1, dynamic_size=True)
        object_mask_bool = K.cast(object_mask, 'bool')
        def loop_body(b, ignore_mask):
            true_box = tf.boolean_mask(y_true[l][b,...,0:4], object_mask_bool[b,...,0])
            iou = box_iou(pred_box[b], true_box)
            best_iou = K.max(iou, axis=-1)
            ignore_mask = ignore_mask.write(b, K.cast(best_iou<ignore_thresh, K.dtype(true_box)))
            return b+1, ignore_mask
        _, ignore_mask = K.control_flow_ops.while_loop(lambda b,*args: b<m, loop_body, [0, ignore_mask])
        ignore_mask = ignore_mask.stack()
        ignore_mask = K.expand_dims(ignore_mask, -1)

        # K.binary_crossentropy is helpful to avoid exp overflow.
        xy_loss = object_mask * box_loss_scale * K.binary_crossentropy(raw_true_xy, raw_pred[...,0:2], from_logits=True)#anchor中心点xy用了BCE?
        wh_loss = object_mask * box_loss_scale * 0.5 * K.square(raw_true_wh-raw_pred[...,2:4])#wh使用了MSE_LOSS
        confidence_loss = object_mask * K.binary_crossentropy(object_mask, raw_pred[...,4:5], from_logits=True)+ \
            (1-object_mask) * K.binary_crossentropy(object_mask, raw_pred[...,4:5], from_logits=True) * ignore_mask
        class_loss = object_mask * K.binary_crossentropy(true_class_probs, raw_pred[...,5:], from_logits=True)#针对每个类别使用BCE,而不是softmax+CE

        xy_loss = K.sum(xy_loss) / mf
        wh_loss = K.sum(wh_loss) / mf
        confidence_loss = K.sum(confidence_loss) / mf
        class_loss = K.sum(class_loss) / mf
        loss += xy_loss + wh_loss + confidence_loss + class_loss
        if print_loss:
            loss = tf.Print(loss, [loss, xy_loss, wh_loss, confidence_loss, class_loss, K.sum(ignore_mask)], message='loss: ')
    return loss
YOLO类
负责图像的读取等一些脚本,还有anchor的生成
1
2
3
4
5
6
7
8
9
10
11
12
13
14
15
16
17
18
19
20
21
22
23
24
25
26
27
28
29
30
31
32
33
34
35
36
37
38
39
40
41
42
43
44
45
46
47
48
49
50
51
52
53
54
55
56
57
58
59
60
61
62
63
64
65
66
67
68
69
70
71
72
73
74
75
76
77
78
79
80
81
82
83
84
85
86
87
88
89
90
91
92
93
94
95
96
97
98
99
100
101
102
103
104
105
106
107
108
109
110
111
112
113
114
115
116
117
118
119
120
121
122
123
124
125
126
127
128
129
130
131
132
133
134
135
136
137
138
139
140
141
142
143
144
145
146
147
148
149
150
151
152
153
154
155
156
157
158
159
160
161
162
163
164
165
class YOLO(object):
    _defaults = {
        "model_path": cfg.load_weights,
        "anchors_path": 'model_data/yolo_anchors.txt',
        "classes_path": 'model_data/my_classes.txt',
        "score" : 0.1,
        "iou" : 0.1,
        "model_image_size" : (416, 416),
        "gpu_num" : 1,
    }

    @classmethod
    def get_defaults(cls, n):
        if n in cls._defaults:
            return cls._defaults[n]
        else:
            return "Unrecognized attribute name '" + n + "'"

    def __init__(self, **kwargs):
        self.__dict__.update(self._defaults) # set up default values
        self.__dict__.update(kwargs) # and update with user overrides
        self.class_names = self._get_class()
        self.anchors = self._get_anchors()
        self.sess = K.get_session()
        self.boxes, self.scores, self.classes = self.generate()

    def _get_class(self):
        classes_path = os.path.expanduser(self.classes_path)
        with open(classes_path) as f:
            class_names = f.readlines()
        class_names = [c.strip() for c in class_names]
        return class_names

    def _get_anchors(self):
        anchors_path = os.path.expanduser(self.anchors_path)
        with open(anchors_path) as f:
            anchors = f.readline()
        anchors = [float(x) for x in anchors.split(',')]
        return np.array(anchors).reshape(-1, 2)

    def generate(self):
        model_path = os.path.expanduser(self.model_path)
        assert model_path.endswith('.h5'), 'Keras model or weights must be a .h5 file.'

        # Load model, or construct model and load weights.
        num_anchors = len(self.anchors)
        num_classes = len(self.class_names)
        is_tiny_version = num_anchors==6 # default setting
        try:
            self.yolo_model = load_model(model_path, compile=False)
        except:
            self.yolo_model = tiny_yolo_body(Input(shape=(None,None,3)), num_anchors//2, num_classes) \
                if is_tiny_version else yolo_body(Input(shape=(None,None,3)), num_anchors//3, num_classes)
            self.yolo_model.load_weights(self.model_path) # make sure model, anchors and classes match
        else:
            assert self.yolo_model.layers[-1].output_shape[-1] == \
                num_anchors/len(self.yolo_model.output) * (num_classes + 5), \
                'Mismatch between model and given anchor and class sizes'

        print('{} model, anchors, and classes loaded.'.format(model_path))

        # Generate colors for drawing bounding boxes.
        hsv_tuples = [(x / len(self.class_names), 1., 1.)
                      for x in range(len(self.class_names))]
        self.colors = list(map(lambda x: colorsys.hsv_to_rgb(*x), hsv_tuples))
        self.colors = list(
            map(lambda x: (int(x[0] * 255), int(x[1] * 255), int(x[2] * 255)),
                self.colors))
        np.random.seed(10101)  # Fixed seed for consistent colors across runs.
        np.random.shuffle(self.colors)  # Shuffle colors to decorrelate adjacent classes.
        np.random.seed(None)  # Reset seed to default.

        # Generate output tensor targets for filtered bounding boxes.
        self.input_image_shape = K.placeholder(shape=(2, ))
        if self.gpu_num>=2:#此处对GPU的设置了!!!
            self.yolo_model = multi_gpu_model(self.yolo_model, gpus=self.gpu_num)
        boxes, scores, classes = yolo_eval(self.yolo_model.output, self.anchors,
                len(self.class_names), self.input_image_shape,
                score_threshold=self.score, iou_threshold=self.iou)
        return boxes, scores, classes

    def detect_image(self, image):
        start = timer()

        if self.model_image_size != (None, None):
            assert self.model_image_size[0]%32 == 0, 'Multiples of 32 required'
            assert self.model_image_size[1]%32 == 0, 'Multiples of 32 required'
            boxed_image = letterbox_image(image, tuple(reversed(self.model_image_size)))
        else:
            new_image_size = (image.width - (image.width % 32),#保证是32的倍数
                              image.height - (image.height % 32))
            boxed_image = letterbox_image(image, new_image_size)
        image_data = np.array(boxed_image, dtype='float32')

        # print(image_data.shape)
        image_data /= 255.
        image_data = np.expand_dims(image_data, 0)  # Add batch dimension.

        out_boxes, out_scores, out_classes = self.sess.run(
            [self.boxes, self.scores, self.classes],
            feed_dict={
                self.yolo_model.input: image_data,
                self.input_image_shape: [image.size[1], image.size[0]],
                K.learning_phase(): 0
            })

        # print('Found {} boxes for {}'.format(len(out_boxes), 'img'))

        font = ImageFont.truetype(font='./font/FiraMono-Medium.otf',
                    size=np.floor(3e-2 * image.size[1] + 0.5).astype('int32'))
        thickness = (image.size[0] + image.size[1]) // 300

        label_record = []
        score_record = []
        top_record = []
        left_record = []
        bottom_record = []
        right_record = []
        jpg_record = []

        for i, c in reversed(list(enumerate(out_classes))):
            predicted_class = self.class_names[c]
            box = out_boxes[i]
            score = out_scores[i]

            label = '{} {:.2f}'.format(predicted_class, score)
            draw = ImageDraw.Draw(image)
            label_size = draw.textsize(label, font)

            top, left, bottom, right = box
            top = max(0, np.floor(top + 0.5).astype('int32'))
            left = max(0, np.floor(left + 0.5).astype('int32'))
            bottom = min(image.size[1], np.floor(bottom + 0.5).astype('int32'))
            right = min(image.size[0], np.floor(right + 0.5).astype('int32'))
            # print(label, (left, top), (right, bottom))

            label_record.append(predicted_class)
            score_record.append(score)
            top_record.append(top)
            left_record.append(left)
            bottom_record.append(bottom)
            right_record.append(right)

            if top - label_size[1] >= 0:
                text_origin = np.array([left, top - label_size[1]])
            else:
                text_origin = np.array([left, top + 1])

            # My kingdom for a good redistributable image drawing library.
            for i in range(thickness):
                draw.rectangle(
                    [left + i, top + i, right - i, bottom - i],
                    outline=self.colors[c])
            draw.rectangle(
                [tuple(text_origin), tuple(text_origin + label_size)],
                fill=self.colors[c])
            draw.text(text_origin, label, fill=(0, 0, 0), font=font)
            del draw

        end = timer()
        return image, label_record, score_record, top_record, left_record, bottom_record, right_record

    def close_session(self):
        self.sess.close()
开始一个YOLO的训练
1
2
3
4
5
6
7
8
9
10
11
12
13
14
15
16
17
18
19
20
21
22
23
24
25
26
27
28
29
30
31
32
33
34
35
def create_model(input_shape, anchors, num_classes, load_pretrained=True, freeze_body=2,
            weights_path='model_data/yolo_weights.h5'):
    '''create the training model'''
    K.clear_session() # get a new session
    image_input = Input(shape=(None, None, 3))
    h, w = input_shape
    num_anchors = len(anchors)

    y_true = [Input(shape=(h//{0:32, 1:16, 2:8}[l], w//{0:32, 1:16, 2:8}[l], \
        num_anchors//3, num_classes+5)) for l in range(3)]

    model_body = yolo_body(image_input, num_anchors//3, num_classes)#搭建全部网络主体
    print('Create YOLOv3 model with {} anchors and {} classes.'.format(num_anchors, num_classes))

    if load_pretrained:
        model_body.load_weights(weights_path, by_name=True, skip_mismatch=True)
        try:  # 可能会出现异常情况,使用try..except消除异常情况
            model_body = multi_gpu_model(model_body, gpus=cfg.GPUs, cpu_relocation=False)
            print("=======Training using multiple GPUs..======")
        except ValueError:
            # parallel_model = east_network
            print("=======Training using single GPU or CPU====")
        print('Load weights {}.'.format(weights_path))
        if freeze_body in [1, 2]:#feeze网络
            # Freeze darknet53 body or freeze all but 3 output layers.
            num = (185, len(model_body.layers)-3)[freeze_body-1]
            for i in range(num): model_body.layers[i].trainable = False
            print('Freeze the first {} layers of total {} layers.'.format(num, len(model_body.layers)))

    model_loss = Lambda(yolo_loss, output_shape=(1,), name='yolo_loss',
        arguments={'anchors': anchors, 'num_classes': num_classes, 'ignore_thresh': 0.5})(
        [*model_body.output, *y_true])
    model = Model([model_body.input, *y_true], model_loss)

    return model
总结
去浮躁,重基础,学扎实,动手实现